
Description
Description
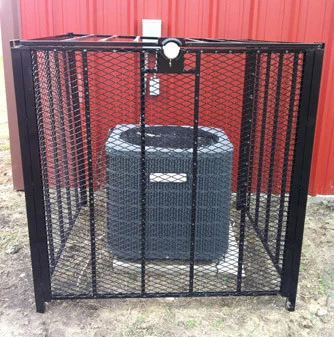
AC Cage, T-Rex 4′ x 4′ Bolt Down Air Conditioner Protection Cage
Reduce vandalism & theft of outside air conditioning compressor units with A/C Cage Guard. This cage is made of steel and measures 4′ w x 4′ d x 48″ h with a black powder coating finish. The side panels of the cage have extra coverage with wire mesh. The top panel secures all side panels and locks with a puck lock (Master Lock 6270) while still offering easy access for AC Technicians. Installation of cages is quick and easy while allowing for mounting flexibility including: Extended posts for embedded ground mounts and bolt down base plates for surface mounts. A.C. Cage is 3-sided but can be ordered with 4. Customization available, call for details.
- Protects from thefts, vandalism & pets
- Installation is quick and simple
- Easy access for A/C service technicians
- Patented design – the top panel secures all side panels and locks with a puck lock (Master # 6270)
- Each cage has mounting flexibility and includes:
- Extended posts for embedded ground mounts
- Bolt down base plates for surface mounts
- Large inventory ready for quick delivery
| Part # | Size | Finish | Security Bar | Leveling Legs | # of Sides | Mesh siding |
| PG-T-REX3X3 | 3’W x 3’D x 3’H | Black Powder Coated | No | No | 3 | Yes |
| PG-T-REX4X4 | 4’W x 4’D x 4’H | Black Powder Coated | No | No | 3 | Yes |
| PG-T-REX5X7 | 5’W x 7’D x 59″H | Galvanized | Yes | Yes | 4 | No |
| PG-T-REX6X9 | 6’W x 9’D x 71″H | Galvanized | Yes | Yes | 4 | No |
| PG-T-Rex8x12 | 8’W x 12’D x 65″H | Galvanized | Yes | Yes | 4 | No |
A.C. Cage Contents Checklist
A.C. Cage Spec Sheet
Instructions for Installation
Step # 1. Determine post style (plated post for concrete installation or extended post for dirt installation)
Step # 2. Attach either plated or extended post extensions to the bottom of the post with included bolts (repeat step for all 4 post)
Step # 3. Slide Side Panel 1 into the channel of Post A and secure with self-tapping tek-screws (2)
Step # 4. Then secure Side Panel 1 into the channel of Post B with self-tapping tek-screws (2)
Step # 5. Secure Front Panel into channel of Post A with self-tapping tek-screws (2) *Be sure hasp is at top of panel*
Step # 6. Attach Post D to Front Panel with self-tapping tek-screws (2)
Step # 7. Attach Side Panel B to Post D with self-tapping tek-screws (2)
Step # 8. Attach Side Panel B to Post C with self-tapping tek-screws (2)
Step # 9. Slide in anti-separation bar into designate slots at the top of the post to go over the top of all panels.
Step # 10. Slide Top Panel horizontally into Post channels (top hasp must align with Front Panel lock hasp)
Step # 11. Install Puck Lock
Step # 12. Extended Post Installation: Dig holes to the appropriate level of depth and add concrete to secure the post
OR
Plated Post Installation: Connect plated post to concrete with wedge anchors.
Reviews
There are no reviews yet.